Showing posts with label original art. Show all posts

Monday, July 6, 2015

Another Elegant Writer Painting

I will say that this kind of art is improving my handwriting skills, something I have never been very proud of, my cursive writing when I was in school (back in the stone age) was terrible at best, and tended to change if I had to write a long page of text, slanting right, then left, if I didn't have lines to follow, the script wandered up and down and was just generally a mess.

I have been looking at hand writing fonts on my computer, but only to pick out a few letters I want to feature, I have ended up doing my own thing on most of these types of artworks.

I am still playing and experimenting with the Elegant Writer pen, I did another small picture for my niece who came out to visit over the holiday weekend with her mom (my sister) and her dad. I am pretty happy with the handwritten cursive text, I did do it lightly in pencil first, just to get the layout, then went over it with a Micron marker (03 I believe), I then erased the pencil then went back over the letters to give some weight to them.

Here is the picture, you can click on it to make it larger.

Sunday, July 5, 2015

Elegant Writer Watercolor Art

I absolutely love YouTube and the wonderful (generous) artists who create tutorials and upload them there. One I found a while back and rediscovered it recently features a calligraphy pen called the Elegant Writer by Speedball. Someone figured out that the black ink in that pen, when activated by water, bleeds out in shades of gray, blue, purple, pink and even some greens. These colors are spontaneous, you can't really control the colors, but if you blot the ink/water mix while it's still wet, you can bring out the more pinky colors.

I am experimenting with this pen now, since I love watercolor, this is a natural for me, you can leave the colors that happen as is, or you can add more color with watercolor, colored pencil or whatever you like, you can also add Micron pens to the mix, those do not bleed when wetted with water.

Here is a quick card I made just a few minutes ago, with the exception of the green in the stem, all the rest of the color happened as a result of using the Elegant Writer and water. I wrote the quote using the Elegant Writer but chose not to wet that, preferring the crisp letters.

Let me know what you think?


Wednesday, June 17, 2015

Bible Art Journaling

I have been turned on to another art practice, it's called Bible Art Journaling, it's a way to combine art with the Bible. There are many groups on FaceBook, Pinterest, YouTube and the such with wonderful artists displaying their journaling Bibles. I finally jumped in and purchased 2 notetakers Bibles, these have wide blank margins on the side of each page where you can write notes, or create art to illustrate (or illuminate) a particular scripture or chapter.

This is the first one I have done, I bought 2 Bibles because I wanted to give one to a good friend of mine, who is also an artist and LOVES to write in her Bibles, I have seen some of her Bibles that have more ink that she added than the original text, and that is a good thing, that means she is really involved in her walk with the Lord.

I did this lion, it illuminates the scripture Proverbs 28:1b ...but the righteous are bold as a lion.


This is what I put in the front of the Bible, I searched for an appropriate quote to express my feelings to my friend, I am happy with this. The flowers I learned how to do from a very talented artist Michelle Hotchkiss, you can see the video tutorial she did below.


Wood Post Painting Finished

Here it is, my wooden fence post is complete, I did finish it the day I said I would, but haven't had the chance to post anything about it lately, been working some crazy hours, not complaining, I love my job (merchandising), I do get to drive all over some beautiful country and this spring, the wildflowers were gorgeous, I stopped more than once to grab a photo of a flower, fence post or sunset.

Here is the finished painting, I added the rusty wire and tweaked it here and there. This picture is now some 500 miles east of here in my mother-in-law's house, she plans on framing it and hanging it on the wall, quite a compliment, she is a wonderful artist in her own right.


Sorry for the copyright stuff, but unfortunately there are those few unscrupulous folk who take advantage....

I'm sure I'll be doing this painting again, it's turning into an old friend :) I will most likely omit the branches that hang down in the upper right, they are in the original photo, but I just don't like how they look in the painting. I am happier with how the wood post turned out, and the pine tree on the left, it looks more like the tree in the original photo.

Wretha

Sunday, May 10, 2015

Wooden Post Landscape part deux WIP

I really enjoyed painting the first Wooden Post Landscape picture, but knew I wanted to do it again, I started last week, worked on it today (yesterday now) for about 2 hours each time, I am so happy with how this one is turning out, there is much more detail and more accuracy in this one, I love painting and drawing wood, the post is much more like the real post out in my yard, especially the old nail holes. One thing I did differently than the original photo is I made the mountains more prominent, they almost vanish in the background, so I made them stand up a bit higher.

Of course right now this is a WIP, not finished yet, I hope to get it done after church tomorrow, I need to work on the closer dark branches on the right, and I need to add the old, curled, rusty fence wire. I must study how the wire moves away on the right side to make the perspective look right.

I created this using Fluid Watercolor block paper, hot press finish, 9x12, so far I have painted with Derwent Inktense Blocks, I'll use Derwent Inktense Pencils to do the wire fence.

Another thing I've started, well actually I'm waiting for 2 note takers Bibles to arrive, I am going to start Bible art journaling, I am very excited to do this, I hope the Bibles show up this next week, though I doubt I'll have time to start anything because it's going to be a very busy week at work, perhaps by the following weekend I can start... I'll post more about this as things start to happen. :)

Sunday, April 26, 2015

Wooden post landscape

My muse struck again, this time I decided to paint from one of my photos of the property.

This is the view looking toward the west, the wooden post came from a friend's house, the rusted wire came from a local ranch that was replacing their fencing, we got a few rolls of that wire. Lots of history in the post and wire.

I did this on Fluid Watercolor Blocks, 130 lb, 9x13, I used Derwent Inktense blocks and pencils to paint the picture, I started it about a week ago and put the finishing touches on it today. This is the first time I've used watercolor block paper, it's watercolor paper that is glued down on 2 (or more) sides so you can wet the paper without fear of buckling or warping, I really like it. This is the cold pressed paper, I just ordered the same brand and type but in a hot pressed form, I can't wait to try that.

I plan on painting from the reference photo again, maybe several times, I really like this view, and I need to polish up my trees, they look just fine here, but MY trees are more rounded (more cedar like-less fir like), I also want to improve the mountains in the background and the sky, basically everything, I'm very happy with the wooden post and the rusted wire.

I am giving this to a friend for her birthday, she saw it last week before it was fully completed, she liked it. I'm pretty happy with it too :) This is the first full page landscape painting I have done in quite a number of years, I'm thinking the last time I painted anything like this was over 30 years ago, I'm happy to get back into the swing of painting.

Friday, January 30, 2015

CRE8365 day 29 - Jack Rabbit

Day 2 of playing around with Autodesk SketchBook, I was planning on doing another big headed critter, I looked for reference pictures of jack rabbits, a critter we have a plethora of out here, well the big headed part didn't happen, maybe next time it will. Our jack rabbits are pretty big, but thin for their size, their legs are long, especially the rear legs, and they have very long ears that you can almost see through they are so paper thin, that's how they dissipate heat in the summer. They are skittish animals, I love seeing them, except when I am driving, they run zig zag in front of your car, and just when you think they have finally left the road, they race back in front of you to do it all over again.

I looked at several different reference photos to get the jack rabbit and prickly pear cactus just right, I am pretty happy with this one, one detail you might notice is the grass in front of the cactus is called Texas Grama . I did have to finish it in Photoshop to bump up the color saturation and contrast. Use your right-click to view full size.

http://cre8365.com/activity/

Wednesday, January 28, 2015

CRE8365 day 27 - Cardinal rule

I have had a lot of fun playing with bird images, drawing and painting them, I have worked hard to try to get them looking real, today I wanted to play, one of the way we as humans learn is to emulate what another does, notice I didn't say "copy", but emulate, just ask any toddler and they will tell you :)

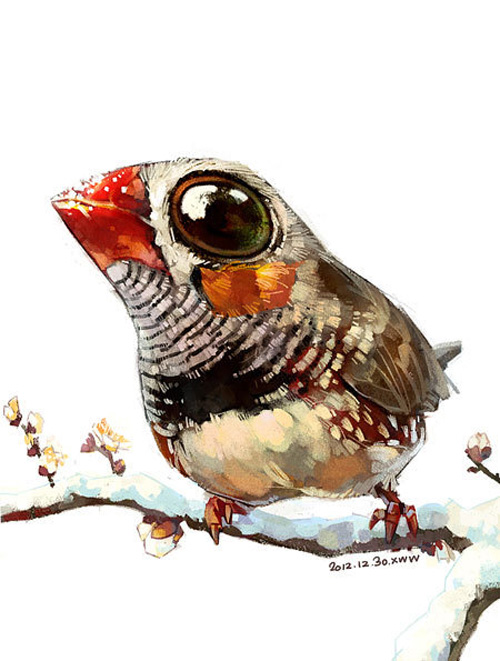
I was scrolling through Pinterest and one of the images jumped out at me, this artist (an artist duo) created some paintings/illustrations that are realistic with a big dash of surrealism tossed in for fun. The image I saw was a zebra finch with an almost ludicrously large head, eyes, and beak.

I had an image of a cardinal bird that I had been wanting to paint, so I took this artists' style and applied it to the cardinal and this is what came out. No one would mistake my rendering for something these artists may have done, but it certainly stretched my horizons.

My image was created using Sketch Guru and finished in Photoshop.

You can see the image that inspired me to take this journey and see more from this pair of artists here:
http://www.myowlbarn.com/2013/08/illustrations-by-chinese-duo-xue-wawa.html

http://cre8365.com/

Tuesday, January 27, 2015

CRE8365 day 26 - Digital Koi

My submission for the day is a Koi fish done in Sketch Guru, then I popped it into Photoshop to adjust the color saturation and contrast. I have noticed that the work I do on my tablet looks richly colored, but once I move it to my laptop, it seems to lose color and contrast, I'm not sure which one is giving me a true representation...

A few years back I drew a koi in a pond with lily pads, this was inspired by another artist's painting. I wanted to do something somewhat serious in a less than serious medium, Crayola Crayons, what is less serious than crayons?
http://cre8365.com

Monday, January 26, 2015

CRE8365 day 25 - Closeup detail of Wandering Jew blossom

I am pretty happy with this one, it's a drawing/painting of a blossom from the Wandering Jew plant in our window. I created this using Sketch Guru and finished it in Photoshop.

This took me 3-4 hours though it didn't seem like it was that long. I feel like I'm getting a handle on Sketch Guru, it's a fairly simple app, but it has lots of potential. I pretty much only use 2 of the brushes available in the app, the line and spray. The only thing I wish that program had was a way to blend or blur, but so far I've been able to work around that limitation.
http://cre8365.com

Saturday, January 24, 2015

CRE8365 day 24 - Rojo the parrot

I drew this image using an app called "Draw and Paint Pad", it's for Android based systems. This is the first thing I've done with this program, I am not as comfortable with it as I am Sketch Guru, but I suspect that will change as I work with it more.

After several starts and stops, I decided to draw a parrot that has been in my family since I was an early teen, she is a Red Headed Amazon parrot, aka Mexican Red Headed parrot. I did this from memory, and in reality she doesn't have that huge blue spot on her cheek, but there is a small bit of blue, you have to be really close to see it. And under the red feathers on her head, it's bright yellow, but you'd never see it unless she allowed you to scratch her head. Mostly though, you see the green body and the red head. I do have the beak a little larger than it really is, I suspect that is a subconscious reaction to being bitten by that beak a few times :)

http://cre8365.com

Saturday, January 17, 2015

CRE8365 day 17 - Sunrise Photographs and VW Bug sketch

I really felt bad about yesterday's creative endeavor, so today I wanted to make up for it, I actually did 3 things today, the first 2 are photos I took this morning, the sunrise was so pretty. My camera is a lower end mid-range camera, good enough, but it doesn't capture the colors that human eyes can see, the biggest issue is having bright sky and dark land. So I ran the pictures through Photoshop and enhanced the color to make them look more like they really looked to me. I did make them a bit more colorful, but they are really close to how it looks to me.


Later on in the day, I decided to get out Sketch Guru and paint from a picture I took earlier in the year of my old VW bug, it's sitting in my driveway, I love driving that bug, especially out where I live, we have 70+ miles of unpaved mountain roads, those old bugs really go on those kinds of roads. Hubby gave it that paint job, green camo.
http://cre8365.com/
Come on over and join in with the creative fun!

Thursday, January 8, 2015

CRE8365 day 8 - Acorn Woodpecker in Derwent Inktense

I slept in today, it was so nice to wake up then turn back over and go back to sleep, that's when I have the most interesting dreams, some of them are bookworthy :)

The dogs began to go nuts which told me someone was here so I got up, sure enough one of our friends had come by, we missed him on Christmas so he didn't get one of my Christmas cards, I wanted him to have one so I asked him to stay a little longer while I whipped out another card. I enjoyed drawing and painting this while he watched and chatted with PB.

As an artist, on occasion, someone will ask me "YOU did this?" or they might say "You DID this?" or "You did THIS?", and I say "Yes", well this time the recipient of the card watched it being created, so there was no doubt as to WHO did it :)

This went along with the theme for Christmas this year, well last year technically.... this is an acorn woodpecker.


I am using this as my daily CRE8365 picture.

I also created this image, it goes along with today's theme, "perspective".


http://cre8365.com/

Monday, December 16, 2013

Christmas cards 2013 (Doodle # 17-35)

Alrighty, been super busy but wanted to make some Christmas cards, since leading the zendoodle class a few months ago, and learning that at least one of the ladies in the class were going to be making cards, I felt like I really needed to make these cards... besides, it was so fun! Any excuse to get to doodle, right?

When I started I had no idea how many I would make, it ended up being 19 (plus one that didn't get scanned, I'll explain later), I just sat down several times over a few days and got them done. First I sketched them in pencil, then inked, then some got colored pencil, or colored marker, and/or shading with pencil. I used a gold pen, a silver pen, white pen and silver sharpie marker, on the scans the silver ink comes out looking grey, that's just the nature of the beast.

I did a combination of ZIA and cutesy bears, and one cutesy dog, the dog card went to my neighbor who gave us a rescue dog (Zoe). Turned out that I had almost exactly the number of cards I needed to give to everyone, I still need to make 2 more then I'll be done. The one I didn't scan went to a friend who just lost her husband, I made that card last (of this batch) and didn't have time to scan it.

All the cards with the exception of one are 100% hand done, including the lettering, the only one that I used Photoshop on was the Noel card (on the circles and letters only), I wanted to make the letters look like they were on a spherical surface, after doing the all the hand lettering on the other cards, I know I could have done that as well. All images can be clicked on if you wish to see it larger.

  This is the only dog, and it went to my neighbor up the road who gave us Zoe.
 The lettering was colored with silver Sharpie marker, the bears are shaded with pencil.
 The inside of this card says "A Very Beary Christmas".
 The circles of the balls and the letters were done in Photoshop, all the rest of this card is hand done. I used gold and silver ink on this one.
 I had a good time doing the lettering on this one, when it's first done, it looks so messy, then when I started adding the designs and color, it really came together.
 This one I thought I would be my least favorite, and it turned out to be one of my favorites once I added color.
 I incorporated a ZIA and a realistic leaf design.
 I tried something new by putting in the scrolls, wasn't sure if I would like it or not, but it turned out just fine.
 This was my most intricate design.
 I was running out of ideas, but this still turned out pretty good.
 PB didn't get this one until I colored in the black around the bear. The letters on this are colored with silver Sharpie marker.
 I began adding doves to my designs, I like it.
 I added more doves, I shaded around the doves to make them "pop".
 Some of the letters are done in silver Sharpie marker.
 Silver Sharpie marker...
 I had a good time drawing the bears :)
 Didn't like this one until I added color, then it looked just fine.
 This is the only one I did with colored pencil, it came out OK, it is actually brighter than the scan appears to be.
Another one with silver Sharpie marker.


Altogether, I used:
White cardstock 8.5x11 folded in half
Micron liner pens, black
colored markers
silver Sharpie marker
gold, silver and white ink pen
Ticonderoga pencil

Thursday, October 31, 2013

Doodle # 16

Click to enlarge the images.
This is a special doodle, it's a birthday present for a wonderful friend, she is a Halloween baby :) I was her caretaker for several years, her health is better now so she doesn't need me like she did, during the time I was her caretaker, we spent a lot of time together and we got very close, she considers me like her daughter and I consider her like a mother.

I worked on this for a couple of days, maybe 5-6 hours total, I didn't want it to get busy, I like the white space. I also debated about the shading, after deciding to do it, I am happy that I did it, it really sets off the piece.

I used something new and different (to me) to do this picture, I used tracing paper, it's almost like very thin vellum, it takes the ink very well, and it also takes graphite for shading very well. Being so thin and translucent, it does need a backing sheet of white paper in the frame to make the background look white. Even though it's thin and seems delicate, it is sturdy paper and holds up well to the ink, graphite, eraser, blending stump and all the handling it received before finally going into the frame.

I drew my design/line art in Photoshop, printed it off, then using the tracing paper for what it's best for, I traced the image in ink, then I began to add the doodles and details in ink. Once I was satisfied with the inking, I used a graphite pencil and a blending stump to add the shading.

I put this in a plain black frame, it's about 8x10, I did have to trim the tracing paper to fit.

Supplies:
01, 03, 08 Micron pens, black
black Ticonderoga graphite pencil
blending stump
Mead Academie tracing paper - medium weight - 9x12
black frame 8x10


I took it over to her house shortly after finishing it, she loved it!