♥♥♥♥♥♥♥♥♥♥♥♥♥♥♥♥♥♥♥♥♥ A love of art, drawing, painting, coloring, doodling and photography ♥♥♥♥♥♥♥♥♥♥♥♥♥♥♥♥♥♥♥♥♥
Showing posts with label adult coloring books. Show all posts
Saturday, July 2, 2016
Colored pencils review
I am an artist as well as a colorist for adult coloring books, when KJColors offered this set of colored pencils to me for free in exchange for my honest opinion/review, I jumped at the opportunity. I received 48 colored pencils in a canvas roll up wrap pencil holder, it also contained a cheap paint brush, a cheap pencil sharpener and a Faber-Castell brand blue eraser, all of this was inside a retail box. The pencils were pre-sharpened and arrived intact, no leads were broken.
The first thing I did was take out all of the pencils and arrange them in a more pleasing arrangement for me, by color family, they were close but I have different ideas as to how my colors should be arranged 😊. They come with a good assortment of colors, the only colors that might be considered to fall short are the yellows, there are only 2 yellows, but if you are clever you can get past that.
I was a bit perplexed by the eraser, being a premium name brand, Faber-Castell, I wondered about how well these colors might erase, I was pleasantly surprised to discover they erase quite nicely, kudos to KJColors!
The pencils are hexagonal in shape so they will not roll around, I like that,. The barrels are nice and straight, they are painted with the color of the lead and match up for the most part, there are a few that aren't even close, so a color chart swatch should be done, something I recommend anyhow.
Now down to the important business, how it colors. I'd say they were midrange, they aren't premium high end but you aren't paying premium prices for these. They are definitely higher quality than what you would get in your local dollar store. I colored a page in a coloring book, the colors lay down smoothly and layer & blend nicely. They are a medium hardness/softness, allowing you to get different looks based on how hard you press. None of them broke while I used them, they didn't wear down any faster than I expected them to.
The pencil case is a nice touch, the pencils fit one to a slot and will not fall out, there is also a spot to hold the paintbrush, sharpener and eraser. There is a faux leather flap that covers the sharpened end of the pencils to protect the leads. This wrap rolls up and has a snap fastener so you can take your pencils securely on the road.
The pencil sharpener and paintbrush are really cheap, but they work.
My wish list for future versions:
1. Put color names on the pencils, or at least put numbers on them that correspond with the colors
That's it, that is the only thing I can find wrong. 😊
#KJColors48PremiumColoredPencilsSet #WrethaReviews #KJCOLORS
Tuesday, June 7, 2016
New directions
Looks like I need to revamp this blog, when I first started it was all about my new love, Zentangle, I did enjoy it for a while, but oh are we ever fickle, we meaning me. I turned back to my first love, which is art, painting and drawing. Along with some photography for fun. So anyhoo, I'll be working on getting shed of the tangling links and such (shed is a southern term meaning rid) and start focusing more on what I love to do.
One of those things is adult coloring books, not like rated X, but geared more toward grown ups, more sophisticated lineart, even some grayscale pictures to color.
I've begun to dip my toes into making a coloring book, but in order to get yourself out in front of the pack, your name needs to be known, I have become a member of a coloring team, not sure I can divulge the name so I'll have to be hush hush for now, let's just say that it's not just a single artist, it's a monthly publication with various artists so I have a variety of images to choose from to color. I'll be posting some of the colored pages here as soon as I can. The images I've colored are for next month's issue so I have to wait for the magazine to come out before I can publicly post them.
UPDATE
I asked about telling people about being on the coloring team and was given permission, it's the Color On! magazine, I am really excited to be on this coloring team because I am going to have access to many different artists' work, not just one artist or one style.
I have downloaded pictures from some of the current issues and will be coloring & posting them in the next few days.
One of those things is adult coloring books, not like rated X, but geared more toward grown ups, more sophisticated lineart, even some grayscale pictures to color.
I've begun to dip my toes into making a coloring book, but in order to get yourself out in front of the pack, your name needs to be known, I have become a member of a coloring team, not sure I can divulge the name so I'll have to be hush hush for now, let's just say that it's not just a single artist, it's a monthly publication with various artists so I have a variety of images to choose from to color. I'll be posting some of the colored pages here as soon as I can. The images I've colored are for next month's issue so I have to wait for the magazine to come out before I can publicly post them.
UPDATE
I asked about telling people about being on the coloring team and was given permission, it's the Color On! magazine, I am really excited to be on this coloring team because I am going to have access to many different artists' work, not just one artist or one style.
I have downloaded pictures from some of the current issues and will be coloring & posting them in the next few days.
Tuesday, March 22, 2016
Party Colored Lion
I have several adult coloring books now, I have been experimenting with printing them out on cheap printer paper as well as higher end watercolor paper. This image came from a very inexpensive coloring book found in the Dollar General stores, you will have to go back to the children's coloring book & puzzle books to find this one, it's called Coloring Cats & Dogs and it's published by Bendon Books.
There are 3 titles in this series, and they all run $3.00 each, yes that's right, they are that inexpensive. Yet the paper quality is pretty good, and they are printed one sided, meaning you can color on a page without worrying about bleed through messing up what's on the backside. If you are using a medium that really bleeds through, like markers, it's recommended that you put another sheet of something behind the page you are coloring.
I colored this page with Marco Raffine colored pencils, they come in a 48 and a 72 pack, I have the largest pack, unfortunately they are not available open stock, but they are inexpensive enough, especially compared to the higher end colored pencils that it will not break the bank to buy another entire set. These pencils are an oil based pencil (as opposed to a wax based), they lay the color down pretty well and they layer beautifully. You can blend these as well.
My approach to this picture was to lay down a layer of the lightest color first, then gradually going into the areas where there would be shadows and shading, I applied increasingly darker colors in the same color family, for example, going from a light yellow, to a medium, then to a near brown. I wanted even more contrast so I picked up the black pencil and colored in the deepest shadows and shading.
Since this lion had so much small details drawn in (doodle style), I chose to color in blocks rather than trying to color in the tiny details, I also used very strong and unnatural colors, I wanted to play with these vibrant colors instead of trying to use natural colors for a lion. You may notice the one spot on the left side of the mane that is slightly browner than the rest of the mane, that was where I had started a few days earlier and didn't keep up with the colors I was using, it also shows that I'm not perfect... but I am very happy with how this turned out. If you wish to see how I do this, let me know and I'll be happy to make a video tutorial on how I do this.
Enjoy, click the images to see them full size.
#wrethareviews
There are 3 titles in this series, and they all run $3.00 each, yes that's right, they are that inexpensive. Yet the paper quality is pretty good, and they are printed one sided, meaning you can color on a page without worrying about bleed through messing up what's on the backside. If you are using a medium that really bleeds through, like markers, it's recommended that you put another sheet of something behind the page you are coloring.
I colored this page with Marco Raffine colored pencils, they come in a 48 and a 72 pack, I have the largest pack, unfortunately they are not available open stock, but they are inexpensive enough, especially compared to the higher end colored pencils that it will not break the bank to buy another entire set. These pencils are an oil based pencil (as opposed to a wax based), they lay the color down pretty well and they layer beautifully. You can blend these as well.
My approach to this picture was to lay down a layer of the lightest color first, then gradually going into the areas where there would be shadows and shading, I applied increasingly darker colors in the same color family, for example, going from a light yellow, to a medium, then to a near brown. I wanted even more contrast so I picked up the black pencil and colored in the deepest shadows and shading.
Since this lion had so much small details drawn in (doodle style), I chose to color in blocks rather than trying to color in the tiny details, I also used very strong and unnatural colors, I wanted to play with these vibrant colors instead of trying to use natural colors for a lion. You may notice the one spot on the left side of the mane that is slightly browner than the rest of the mane, that was where I had started a few days earlier and didn't keep up with the colors I was using, it also shows that I'm not perfect... but I am very happy with how this turned out. If you wish to see how I do this, let me know and I'll be happy to make a video tutorial on how I do this.
Enjoy, click the images to see them full size.
#wrethareviews
Monday, March 21, 2016
Coloring Books - Experimenting
Adult coloring books are all the rage right now, I hope it's not just a fad and will be around for a good long time. I'm even considering tossing my name in the hat of creating coloring books.
But for now, I'm just playing with what's out there. Of course I can't leave well enough alone, I must push the boundaries of what can be done. Most coloring books are not meant to be archival, meaning the paper isn't the best, in order to keep the price low enough for people to want to buy, the publishers are using the only slightly better paper for the adult coloring books vs the children's books. If you are just coloring with inexpensive colored pencils or even crayons, that works out OK, but if you want to use wet media, markers or watercolor (pencils or paint), then the average adult coloring book paper leaves a lot to be desired.
As a result, many colorist will scan the pages and print them out on better paper, from cardstock to higher end art papers such as Bristol board and watercolor paper. If you have a laser printer, you are pretty much set to go from there, but many of us use ink jet printers, and unless you have a printer that will use a higher end ink that doesn't smear once dry, you will have a problem the moment you add anything wet to the page, the ink will most likely smear. Of course using dry media is fine on ink jet printouts, but if you are going to use watercolor or something else that is wet, you are heading for disappointment.
I just happen to belong to several Bible art journaling groups, and one thing most Bibles have in common is thin thin thin pages, and nearly anything you put on them, especially the wetter mediums, will nearly always bleed through, so the resourceful artists tried using clear gesso and even matte gel mediums on the paper and discovered it works great, it strengthens the paper, it protects the paper, it helps prevent bleed through. Guess what? This works GREAT for coloring book pages and the pages you print out.
I began to experiment with ink jet printouts on inexpensive (cheap) printer paper, I have coated the pages with clear gesso and also tried matte gel medium, so far I prefer the matte gel medium. I discovered that the clear gesso can cause the ink to smear a bit, but the matte gel medium does not affect the ink jet ink in any way, and one coat is sufficient. Be sure you use a MATTE finish product, anything that is glossy or shiny will not take the color you are trying to apply very well.
Here is a page I painted using Derwent Inktense blocks and pencils, I was liberal with the moisture and had no bleed through, the paper didn't fall apart, the page took the Inktense very well, in fact, it allowed me to treat it more like a watercolor in that I was able to lift some of the color in places to create highlights. Derwent Inktense applies and works like watercolor, but it is in fact an ink that dries permanently so you can do multiple washes without affecting the layer below.
I have not tried painting or coloring on a page with the clear gesso yet, that will be an upcoming project. I have read from other artists that using colored pencils is better over the clear gesso vs the matte gel medium because of the "tooth" that is created by the gesso. I will tell you that with the matte gel medium, the brand doesn't seem to matter, I use Liquitex matte gel medium, but in the clear gesso, it does matter, most of them are too rough to use markers over, they will ruin your markers, Liquitex clear gesso seems to be the worst, the better brands (smoother finish) are Art Basics clear gesso by Prima, Dina Wakley clear gesso by Ranger, and Tri-Art clear gesso.
This picture is from The Amazing World of Horses, just to recap, this was printed out on cheap printer paper with an ink jet printer, I coated one layer of Liquitex matte gel medium, let that dry then painted with Derwent Inktense blocks and pencils, let me know what you think :)
But for now, I'm just playing with what's out there. Of course I can't leave well enough alone, I must push the boundaries of what can be done. Most coloring books are not meant to be archival, meaning the paper isn't the best, in order to keep the price low enough for people to want to buy, the publishers are using the only slightly better paper for the adult coloring books vs the children's books. If you are just coloring with inexpensive colored pencils or even crayons, that works out OK, but if you want to use wet media, markers or watercolor (pencils or paint), then the average adult coloring book paper leaves a lot to be desired.
As a result, many colorist will scan the pages and print them out on better paper, from cardstock to higher end art papers such as Bristol board and watercolor paper. If you have a laser printer, you are pretty much set to go from there, but many of us use ink jet printers, and unless you have a printer that will use a higher end ink that doesn't smear once dry, you will have a problem the moment you add anything wet to the page, the ink will most likely smear. Of course using dry media is fine on ink jet printouts, but if you are going to use watercolor or something else that is wet, you are heading for disappointment.
I just happen to belong to several Bible art journaling groups, and one thing most Bibles have in common is thin thin thin pages, and nearly anything you put on them, especially the wetter mediums, will nearly always bleed through, so the resourceful artists tried using clear gesso and even matte gel mediums on the paper and discovered it works great, it strengthens the paper, it protects the paper, it helps prevent bleed through. Guess what? This works GREAT for coloring book pages and the pages you print out.
I began to experiment with ink jet printouts on inexpensive (cheap) printer paper, I have coated the pages with clear gesso and also tried matte gel medium, so far I prefer the matte gel medium. I discovered that the clear gesso can cause the ink to smear a bit, but the matte gel medium does not affect the ink jet ink in any way, and one coat is sufficient. Be sure you use a MATTE finish product, anything that is glossy or shiny will not take the color you are trying to apply very well.
Here is a page I painted using Derwent Inktense blocks and pencils, I was liberal with the moisture and had no bleed through, the paper didn't fall apart, the page took the Inktense very well, in fact, it allowed me to treat it more like a watercolor in that I was able to lift some of the color in places to create highlights. Derwent Inktense applies and works like watercolor, but it is in fact an ink that dries permanently so you can do multiple washes without affecting the layer below.
I have not tried painting or coloring on a page with the clear gesso yet, that will be an upcoming project. I have read from other artists that using colored pencils is better over the clear gesso vs the matte gel medium because of the "tooth" that is created by the gesso. I will tell you that with the matte gel medium, the brand doesn't seem to matter, I use Liquitex matte gel medium, but in the clear gesso, it does matter, most of them are too rough to use markers over, they will ruin your markers, Liquitex clear gesso seems to be the worst, the better brands (smoother finish) are Art Basics clear gesso by Prima, Dina Wakley clear gesso by Ranger, and Tri-Art clear gesso.
This picture is from The Amazing World of Horses, just to recap, this was printed out on cheap printer paper with an ink jet printer, I coated one layer of Liquitex matte gel medium, let that dry then painted with Derwent Inktense blocks and pencils, let me know what you think :)
Sunday, February 28, 2016
DIY Grey Scale Images
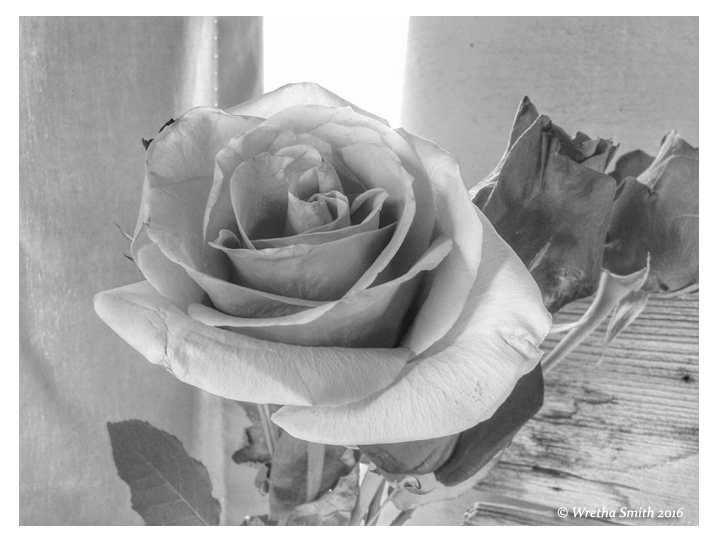
Unless you have been living under a huge rock, and even then I'd wonder about ya, then you have heard about adult coloring books, they are all the rage right now. The next step from the simple (and not so simple) line art, is grey scale (or gray scale) coloring, there are a few grey scale coloring books out there, but how fun would it be to create your own grey scale images from your own photographs?
Now you can, there is an app for that! It's called Snapseed, it's a completely free app put out by Google, it will work for both Android and IOS (iPad & iPhone) devices, it will work on your phone and your tablet, sorry there isn't a version of this for your computer, but I believe most of us have smart phones now.
I created a quick (well quick for me LOL) video showing how to turn a full color image into a grey scale image that you can save, print out and color yourself. There are other programs that will desaturate (remove color) but they can make the image flat, or there may be too much dark in the image, Snapseed is great in that it allows you to adjust the image so it doesn't look flat and isn't too dark.
I'll include the images I edited, the before and after, you are welcome to download, edit with Snapseed, copy, print and color the images for your own personal use, you may share your colored image, please don't use them for any commercial purposes, please leave my copyright in the images, and I'd appreciate a link back to this page.
Original image, full size, full color, click on the image, then right click and save, both images below have a white border for easier printing.

Grey scale image for you to print and color, this should print out on a 8.5X11 inch paper in portrait layout, click on image, then right click and save the image.
Be sure to let me know how this works for you, and if you post any pictures of your colored roses, please leave a link below so I can see it :)
You can find me on many of the adult coloring book FaceBook groups, hop over and say HI!
https://www.facebook.com/groups/greyscalecoloring/
https://www.facebook.com/groups/ColoringBooksForAdults/
https://www.facebook.com/groups/788845437850785/
https://www.facebook.com/groups/brightsidecoloring/
Wretha
keywords
grey scale, gray scale, grayscale, greyscale, adult coloring books,
Now you can, there is an app for that! It's called Snapseed, it's a completely free app put out by Google, it will work for both Android and IOS (iPad & iPhone) devices, it will work on your phone and your tablet, sorry there isn't a version of this for your computer, but I believe most of us have smart phones now.
I created a quick (well quick for me LOL) video showing how to turn a full color image into a grey scale image that you can save, print out and color yourself. There are other programs that will desaturate (remove color) but they can make the image flat, or there may be too much dark in the image, Snapseed is great in that it allows you to adjust the image so it doesn't look flat and isn't too dark.
I'll include the images I edited, the before and after, you are welcome to download, edit with Snapseed, copy, print and color the images for your own personal use, you may share your colored image, please don't use them for any commercial purposes, please leave my copyright in the images, and I'd appreciate a link back to this page.
Original image, full size, full color, click on the image, then right click and save, both images below have a white border for easier printing.

Grey scale image for you to print and color, this should print out on a 8.5X11 inch paper in portrait layout, click on image, then right click and save the image.
Be sure to let me know how this works for you, and if you post any pictures of your colored roses, please leave a link below so I can see it :)
You can find me on many of the adult coloring book FaceBook groups, hop over and say HI!
https://www.facebook.com/groups/greyscalecoloring/
https://www.facebook.com/groups/ColoringBooksForAdults/
https://www.facebook.com/groups/788845437850785/
https://www.facebook.com/groups/brightsidecoloring/
Wretha
keywords
grey scale, gray scale, grayscale, greyscale, adult coloring books,
Subscribe to:
Posts (Atom)