Friday, September 20, 2013

Doodle # 15

This is my first entry into The Bright Owl's Zendala Dare #73, I had quite the good time with this, since the line drawing is already done, it makes it easy to just fill in the spaces, of course I say that now, I'm sure there will be a challenging one in the future :)

Click on image to see full size...

When I first saw this, this screamed for the tangle called Leaflet, that's the ONLY thing I could even consider to put in this layout. I added the flower in the center and the bubbles around the outside. I shaded it with a graphite pencil. I look forward to the next challenge!

I used:
Micron black liner 01, 03
Ticonderoga black graphite pencil
standard white printer paper

Doodle # 14


This is from the Diva Weekly Challenge #136 
this one was a wide open challenge, the only requirements were to use color, we could use any design we chose...

I tried using color a bit in some of my earlier designs but I wasn't happy with them, so I had essentially put color on hold, this challenge made me rethink using color with doodles. This one has subtle color, I picked mostly greens and the yellow, with a hint of purples and pink. The dominant tangle design is called Leaflet,  the Zendala was from the Zendala dare #73 on The Bright Owl's page. I had a great time with this challenge.

I used:
Micron black liner 01, 03
CraZart colored pencils
standard printer paper

Saturday, September 14, 2013

Doodle # 12 and 13

This is from the Diva's Weekly Challenge #135: New Official Tangle "Well" I did 2 variations on the challenge, you will notice I didn't scan in the unshaded version, I decided I was doing that because I was a chicken, I was afraid of messing up my original so I would scan it unshaded, print it out and shade the printed copy... I will not do that again :) The only chicken around here is the kind we eat!
I just BARELY got this one done in time, fortunately I didn't have to go anywhere today (not that going places is a bad thing!), I have the whole day to myself... IT'S DOODLE TIME!

Click on image to see full size :)

This one has these designs:
Well
Prestwood
Allium
Bulb Lantern
Sand Swirl
Screen

This was done with:
#1 and #2 Ticonderoga graphite pencil and 01 & 03 Micron Liner - Black


This one has these designs:
Well
Cayla
PIA
Paradox
Scrolled Feather
Jitterz

This was done with:
#1 and #2 Ticonderoga graphite pencil and 01 & 03 Micron Liner - Black


I had quite the good time working with this challenge, I look forward to the next one!

Saturday, September 7, 2013

P•Keyz

My first pattern, I enjoy playing piano, and wanted to incorporate my musical background into art, piano keys are very geometric in design and even someone who isn't musically inclined knows what piano keys look like. I did a search to see if anyone else had used piano keys in their tangles, and I found a few, but they were ALL flat, from the top down, not dimensional, so I made mine dimensional, it's really easy and I would love to see how you incorporate this into one your own tangles...

Music is very creative as well as mathematical,  it uses both side of our brain :)


     P•Keyz

I call this design P•Keyz (or P-Keys)
Stands for piano keys. It's really simple

1. you draw a curved line, it can be any length you wish
2. you draw a line on either end of the curved line, pointing in at an angle
3. you draw a parallel line, mirroring the first curves line, connecting the 2 lines at the top
4. you draw short vertical lines, coming down from the bottom curved line, these are the ends of the piano keys
5. you draw a line at the bottom of the vertical lines, mirroring the curved horizontal line
6. using perspective, you draw in the tops of the keys with lines going from the tops of the vertical lines, go at an angle toward the top line
7. this is the tricky part, you have to draw in the black keys, you start on the left, about 1/4 to 1/3 of the way in from the front, you draw a heavy black line, following the line vertical to the back. You do 2, skip one, do 3, skip one, do 2, skip one, do 3, skip one, do this until you have all the black keys drawn/colored in.
8. now add some shading.

Hints
You can reverse 4 and 5. After step 3, you skip to step 5, then do step 4, which ever is easier for you.

When you do step 6, I find it easiest to draw the 2 end ones then work my way toward the middle.

You can draw any curved line you wish, coming toward you, going away from you, or you can even make it straight...

You can do this across (horizontal) or up & down (vertical)

You can make one end large and the other end small

Here is my sketch sheet I played with to get this worked out. You can see another couple of designs I created but haven't perfected enough to create a step by step for them...

Enjoy this new design, if you use it, please post a copy if it online and send me the URL (web address) in the comments below so I can see what you have done with it. :)

If by some chance, this pattern already exists, please let me know so I can either remove this one or give proper credit.

Doodle # 10 and # 11

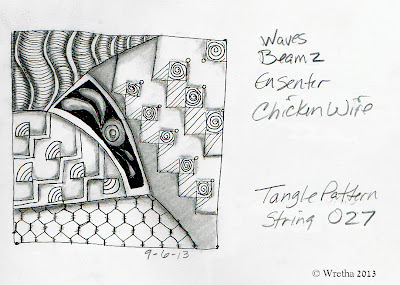
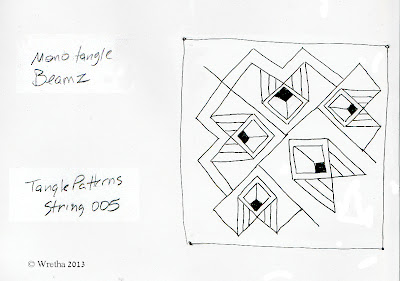
This is for the Diva Challenge #134 "Beamz - by Traci F"
http://iamthedivaczt.blogspot.com/2013/09/weekly-challenge-134.html
WooHoo, I got this one in on time!

I did two of them, there will be 4 pictures here, 2 shaded and 2 unshaded (line art). I have been having so much fun with shading these doodles! Here they are, the first 2 are the ones I'm entering in the challenge, they are shaded:


These are the line art before shading of the two above...


The pattern called ensenter, I created that and I'll post a how to as soon as I can come up with it... it was the carved decoration on an antique piece of furniture I saw recently. It was the "in the center" of the decoration, thus the name ensenter.

These were done with Micron liner pens 005, 01, 02 and 03, a Ticonderoga pencil, other graphite pencils of varying softness.

Which do you like, the shaded or unshaded?

The patterns in these are
Beamz http://www.flickr.com/photos/stahnlunts/9098114407/in/photostream/ 
Waves http://tanglepatterns.com/2010/05/how-to-draw-waves.html
Ensenter (mine)
Chicken wire (haven't found a tutorial for this but know it's out there)

The strings came from here:
TanglePattern 027 http://tanglepatterns.com/2012/11/tanglepatterns-string-027.html
and
TanglePattern 005 http://tanglepatterns.com/2012/06/tanglepatterns-string-005.html

Thursday, September 5, 2013

Doodle # 9

This was supposed to be for last week's Diva challenge #133, "Tipple love it or hate it", I didn't get it finished in time to officially include it in the challenge, I will add it to the list on the Diva's site for that challenge after the fact... I hope to do this week's challenge, but I don't know if I'll get one done in time either.

You can see two examples of TIPPLE in this image, plus
BEADLINES
a variation on
CUBINE
DIVA DANCE
ESCALATOR
FIFE
FRILLEE
HYPNOTIC
KUKE
PRINTEMPS
I included links to the site where I picked the doodles that would go within each section. The pattern in the middle that has the flowers and just below the flowers is my design.

This is my first Diva Challenge, and I'm quite happy with how it turned out. :)

This is what it looked like before I shaded it.


The shading is what took me so long, I had the original line drawing done in plenty of time, but didn't know if I wanted to shade it or not, I also didn't want to upload it here until I was finished with it... so I scanned the line drawing, cleaned it up a bit digitally and printed out a copy, that's what I decided to shade before working on my original, which remains unshaded. I like the line art copy that I shaded. It took me a few days to get it shaded like I wanted it, I am glad I took my time on this, this is my first "big" doodle and I am quite happy with it. I did print out a second copy, that one I will color, though honestly I'm not as "in" to the colored ones, I really like the B&W shaded ones.

I did use an eraser to clean up some edges, places where I wanted to shade but not go over into another area, I didn't worry about going over, I just shaded, smudged, blended then used the eraser to remove the shading in the area of overlap. I used a white charcoal pencil, something that sounds like an oxymoron, I have noticed it really isn't WHITE, it has a bit of a yellow tinge, you can't tell until you lay it on some white paper, not sure if I will continue using it for this.

I'm pretty happy with it, PB says he likes the line art (without shading) better... oh well, each to their own.

I used a Micron 01 and 005 black liner, a Ticonderoga #2 pencil, some softer pencils and charcoal pencils, I blended with a blending stump and Q-tips, I added just a touch of white charcoal pencil.